Want to know how to create a customer satisfaction survey online?
Collecting user feedback about your products or services is one of the best ways to measure customer satisfaction. It helps you see what you’re doing right and what can be improved in your business.
Whether you’re running an eCommerce store or a blog, using a WordPress survey form to get visitor feedback is a powerful tool for improving your business!
In this guide, I’ll show you how to create a customer satisfaction survey on your website easily. You’ll be able to ask customer survey questions on WordPress and measure your customer feedback in only a few steps.
What Are the Best Customer Satisfaction Survey Questions?
Before we jump into how to create a customer satisfaction survey, you’re probably wondering, what are good customer satisfaction survey questions?
While a net promoter score (NPS) survey focuses on customer loyalty, and a customer effort score (CES) survey focuses on the effort needed to interact with your business, a customer satisfaction survey (CSAT) is used to find out how happy customers are with your product, service, and overall customer experience.
The type of customer satisfaction survey questions will differ slightly depending on your business’s product and your preferences.
For example, you could be trying to see your customers’ opinions about a specific touchpoint, like using your customer support chat. In that case, the question wording will be different than if you’re looking to see overall satisfaction levels.
Generally, the questions are something like this:
- How satisfied are you with our product?
- What can we do to make our product better?
Your customer feedback questions help you see what your customers like, what they don’t like, and what they’d like to see improved, which is really valuable data to help you grow your business and make more sales.
Figuring out the “right questions” for a satisfaction survey all depends on what you want to know.
How to Measure a Customer Satisfaction Survey
There are a couple of different ways to measure your customer satisfaction survey KPIs (key performance indicators).
For “How satisfied are you with our product?”, customers use a rating scale to indicate their satisfaction. However, unlike an NPS survey that uses a 10-point Likert scale, in a CSAT survey, you’ll usually want to use an easy 5-point star rating scale.
For “What can we do to make our product better?”, you’ll want to use an open-ended question and a text-box answer so customers can share what they’d like to see improved.
To find out how satisfied your customers are overall, you take the number of satisfied customers (for example, those who rated 4 or 5 stars out of 5) and divide that by the number of total responses. This gives you your customer satisfaction score.
Your CSAT score is a concrete number that you can focus on improving and use to track your progress. A customer satisfaction score gives you valuable information for understanding your entire customer journey.
Meanwhile, answers to the second survey question give you direct suggestions, in your customers’ own words, for how to improve your customer satisfaction score.
How to Create a Customer Satisfaction Survey
Now that you understand how to measure a customer satisfaction survey and why it’s useful, let’s learn how to create one easily.
These are the steps I’ll walk you through:
- Install UserFeedback
- Activate Survey Template Addons
- Create a New Customer Satisfaction Survey
- Edit Your Template
- Add a Thank You Message
- Customize Your Survey Design
- Manage Settings for Your Survey
- Edit Your Notifications for Customer Responses
- Publish Your Customer Satisfaction Survey Online
You’ll be collecting customer feedback on WordPress and improving your customer satisfaction score in only 9 short steps!
Step 1: Install UserFeedback
If you’re looking for the best online survey maker to collect customer feedback, UserFeedback is the answer.
UserFeedback is a powerful plugin for WordPress that helps you find out what your visitors really think. Use its short surveys to make more money, increase engagement, and grow your business faster with candid customer feedback.
With UserFeedback, it’s easy to add customer satisfaction forms and WordPress suggestion boxes to your website. It’s simple to set up, comes with a ton of different survey form templates, and lets you ask all types of questions.
The variety of survey templates and customization options make UserFeedback the best WordPress feedback plugin and the best customer satisfaction tool.
Check out the pricing page and pick the plan that works best for you. The Plus license will give you access to the customer satisfaction survey template and a lot of other features like custom branding and comment boxes.
If you really want to take your customer surveys to the next level, we recommend the Pro license for access to more specific targeting, the ability to schedule surveys in advance (like during a promotion on your site), and many more features.
After you’ve purchased UserFeedback, use this easy guide to install the plugin, and you’ll be ready to create questionnaires in WordPress and run a customer satisfaction survey online.
Get started with UserFeedback now!
Step 2: Activate Survey Template Addons
After installing and activating the UserFeedback plugin with your license key, we’ll activate the addons for customer satisfaction surveys. In your WordPress dashboard, navigate to UserFeedback » Addons.
All the addons available for your license level are listed here. Find Additional Templates and press the Install Addon button. After it finishes installing, the button will say Activate, click it. Now, you’ll need to do the same with the Question Types addon.
You’ll also want to be able to customize the appearance of your CSAT survey, so find the addon that says Branding, and do the same thing.
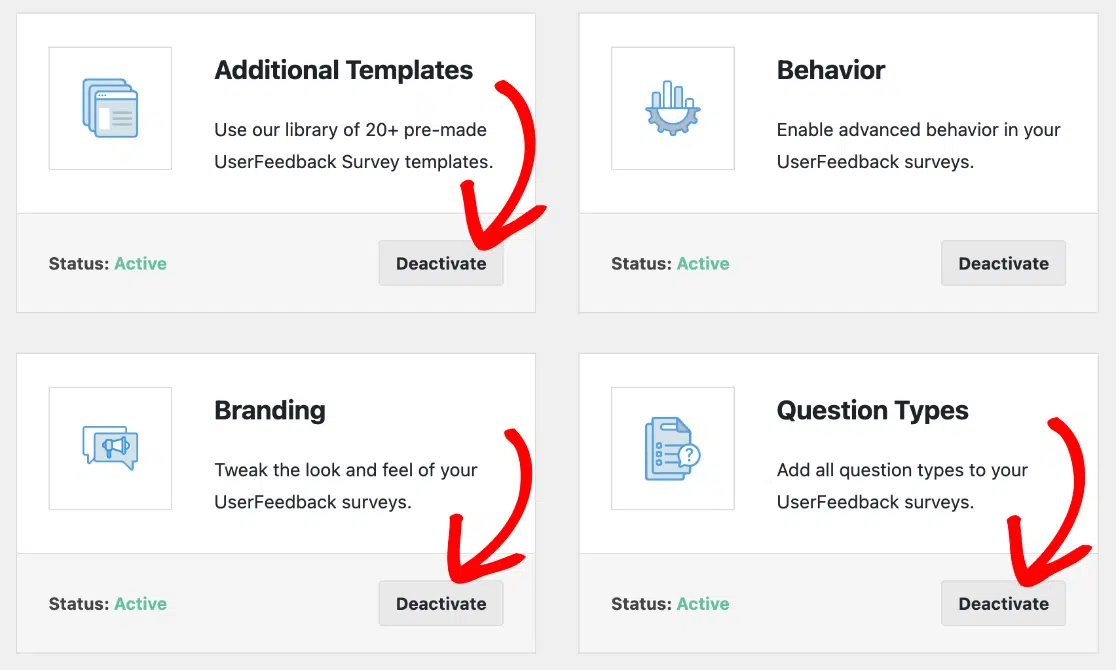
This will give you access to the customer satisfaction survey template, questions, and customized appearance. But for the most customization options and features, you’ll want to go ahead and install all the addons that are available.
Here’s the detailed guide for installing UserFeedback addons.
Step 3: Create a New Customer Satisfaction Survey
Once you’ve finished installing and activating the addons, navigate to UserFeedback » Surveys in your WordPress admin. Press the button that says Create New at the top.

It’s time to create your first customer satisfaction survey. As you’ll see here, UserFeedback has a ton of great feedback templates for a variety of uses.
For this tutorial, find the one titled B2B Satisfaction Survey (PRO), and click it.
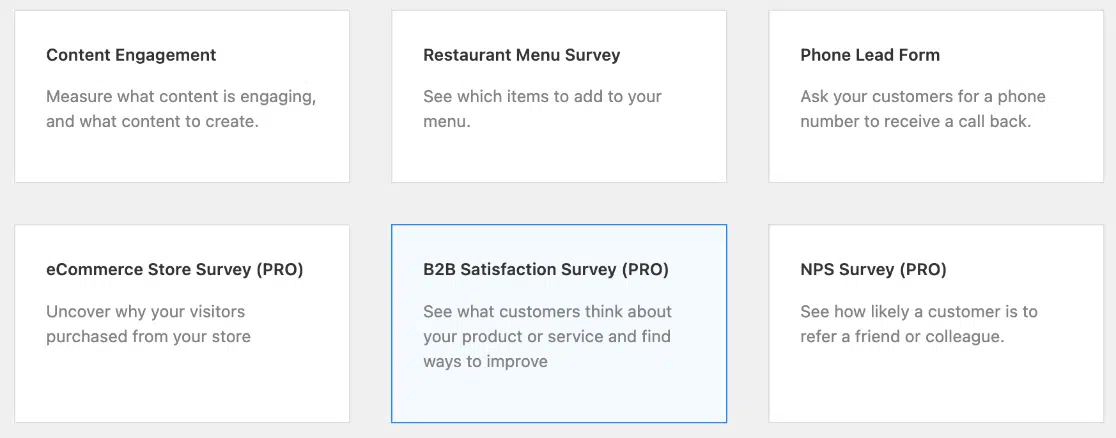
Now you’ll see an editable customer survey template. Next, we’ll show you customer satisfaction survey best practices to set up on your CSAT survey and how to use brand customization.
Step 4: Edit Your Satisfaction Survey Template
First, click the Pencil Icon at the top to change your survey name to whatever you’d like. This won’t show up to customers, but it’ll help you keep track of the different surveys you may run for promotions or other situations.

Now click the drop-down Arrow to the right of the first question, Star Rating, to expand it. Under Question Title, edit the wording of the first question.
It’ll already be populated with a sample customer satisfaction survey question, but you’ll probably want to personalize it to your product/service or customize it to the customer insights you’re after, such as asking your customer base about a specific product feature.
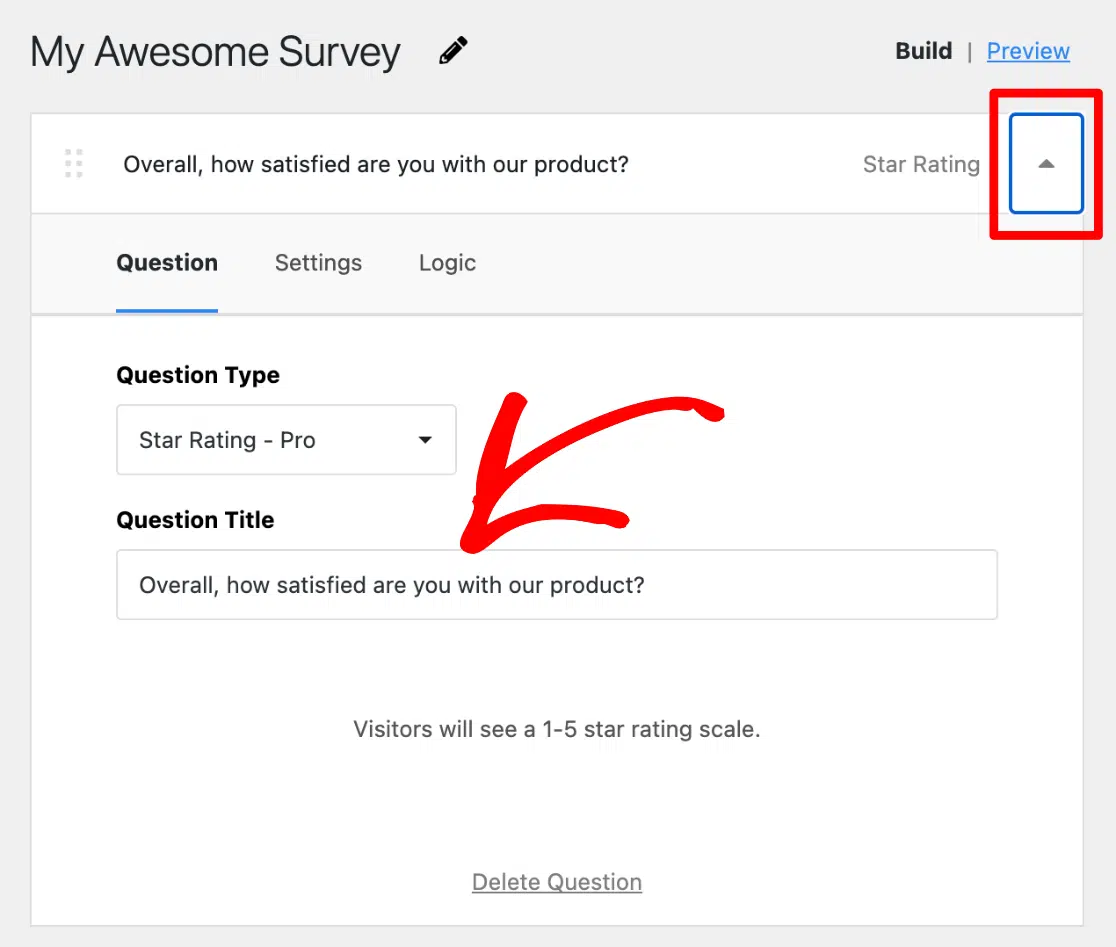
After you’ve edited the title, click the Settings tab. Here, you can toggle on or off whether this question is Required for submitting the survey and if you want to Enable Comment Box.
We recommend making the first question Required to ensure you get the best survey response rate. A comment box is really helpful for other types of surveys, but since the next question in a customer satisfaction survey is already a long answer, it’s probably not necessary.
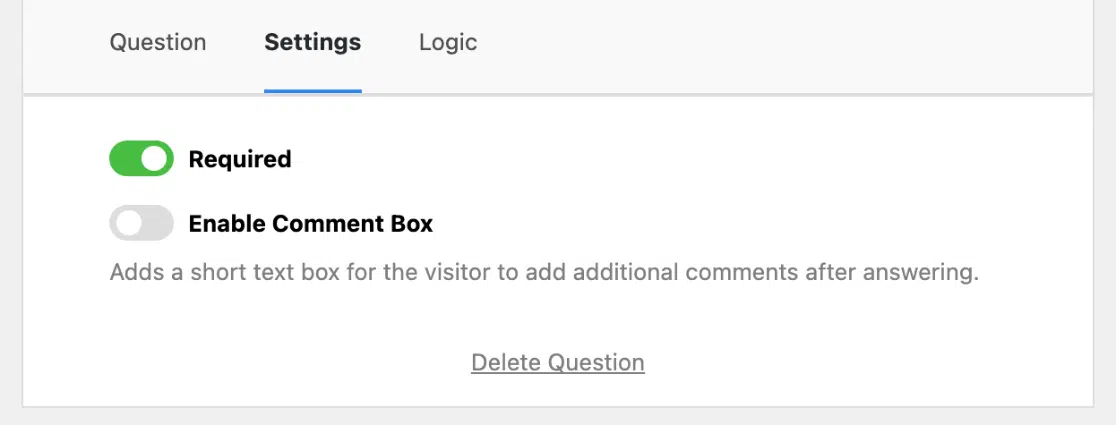
Go ahead and follow the same steps for the next question, Long Answer, by clicking the drop-down Arrow, editing the Question Title, and toggling the option under Settings.
For this question’s Required option, it’s really up to you. If you want to maximize the number of respondents to your first question, it may be better to leave it off. But if customer suggestions are your top priority, you might prefer to toggle it on.
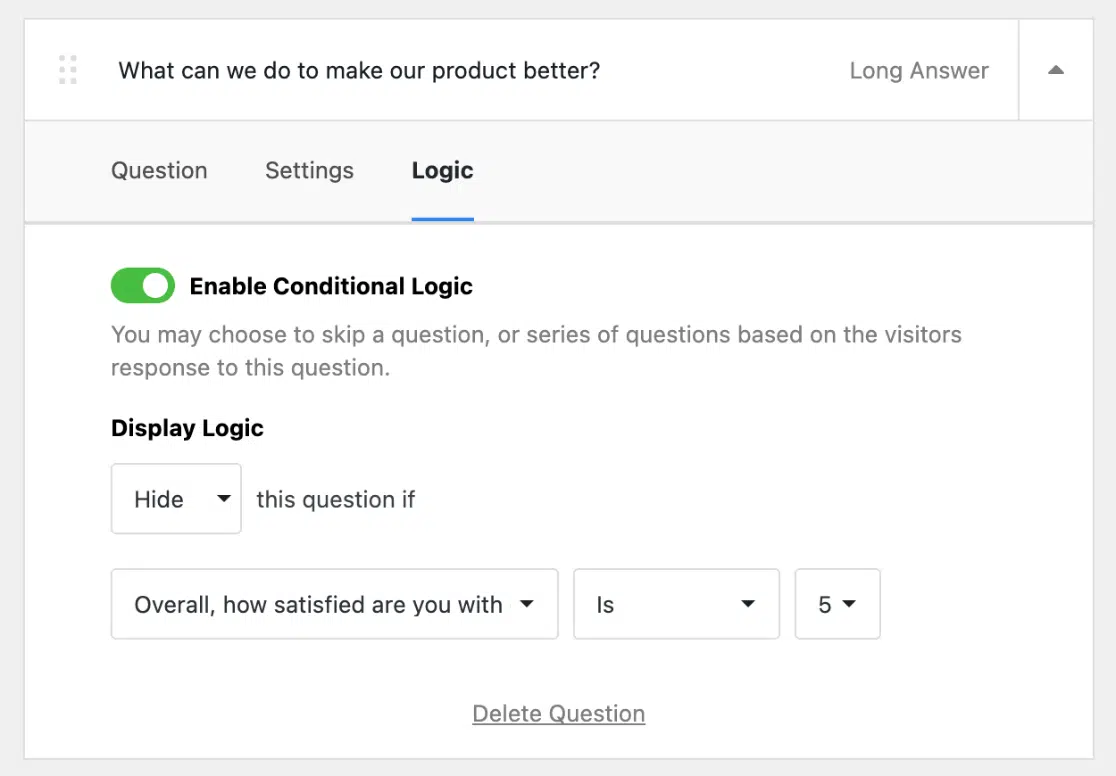
Next, if you’re using the UserFeedback Pro license, you’ll want to click the Logic tab under the Long Answer question. Here you can Enable Conditional Logic. This lets you show or not show this question, depending on the customer’s answer to the previous rating question.
For example, we set it to hide the long answer question if the customer answered the rating question with 5 stars.
If you want to add additional questions to your survey, just press the Add Question button, pick the Question Type, and follow the same steps from above.
For example, maybe you want to learn more about your customer retention or the likeliness of a repurchase (churn). You could follow up with a scale question asking, “How likely are you to switch to another [company, provider, product]?”
Feel free to use scale questions, multiple-choice, yes/no, or other types of questions to gather more market research insight for the metrics you’re after.
Step 5: Add a Thank You Message to Your Customer Survey
Now that you’ve edited your customer satisfaction survey questions, you’ll want to click the Arrow for Thank You Message. Here you can add a custom thank you message to display after your customer finishes answering the satisfaction survey.
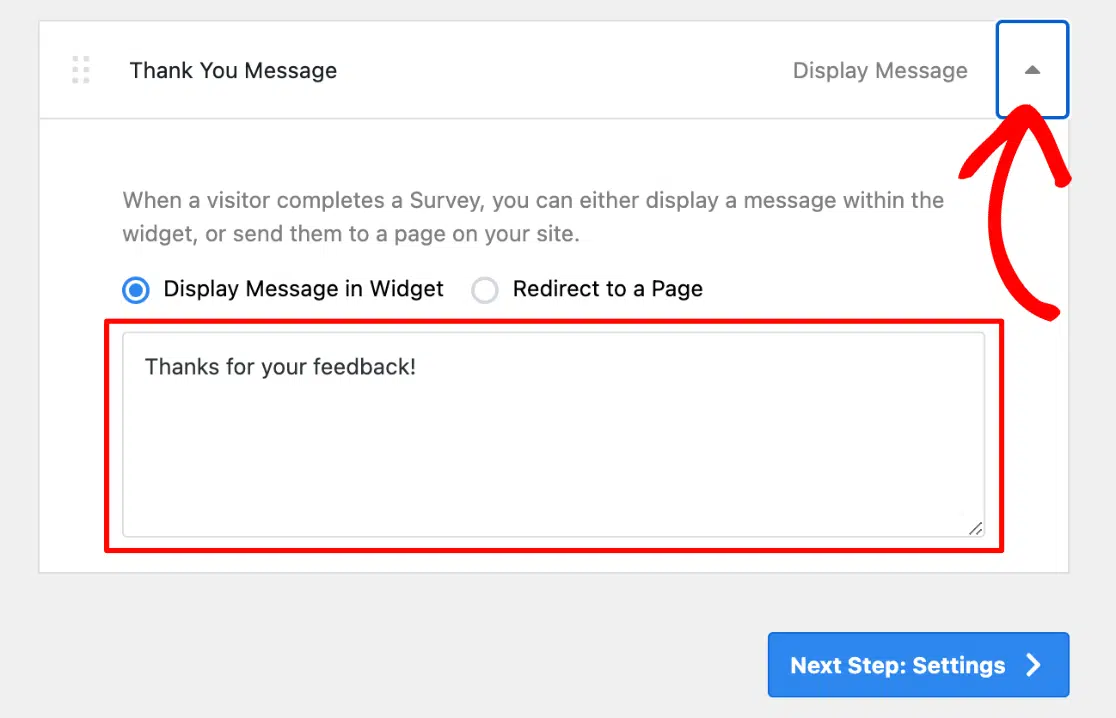
If you have the Pro license or above, you can use the Redirect to a Page option instead. For example, maybe you’re running a social media giveaway or offering incentives for customers who leave a public review. After they’ve completed your satisfaction survey, you could redirect customers to that promotion page.
The survey redirect feature is super useful for businesses, and it’s another reason why I recommend the Pro license.
Step 6: Customize Your Survey Design
Next, it’s on to the fun part: customizing your CSAT survey widget to match your brand. In the top right of the template, click Preview.
Here you can customize your Color Scheme, Widget Color, Text Color, and Button Color. Choose a color from the wheel or input your own HEX color code to match your brand.
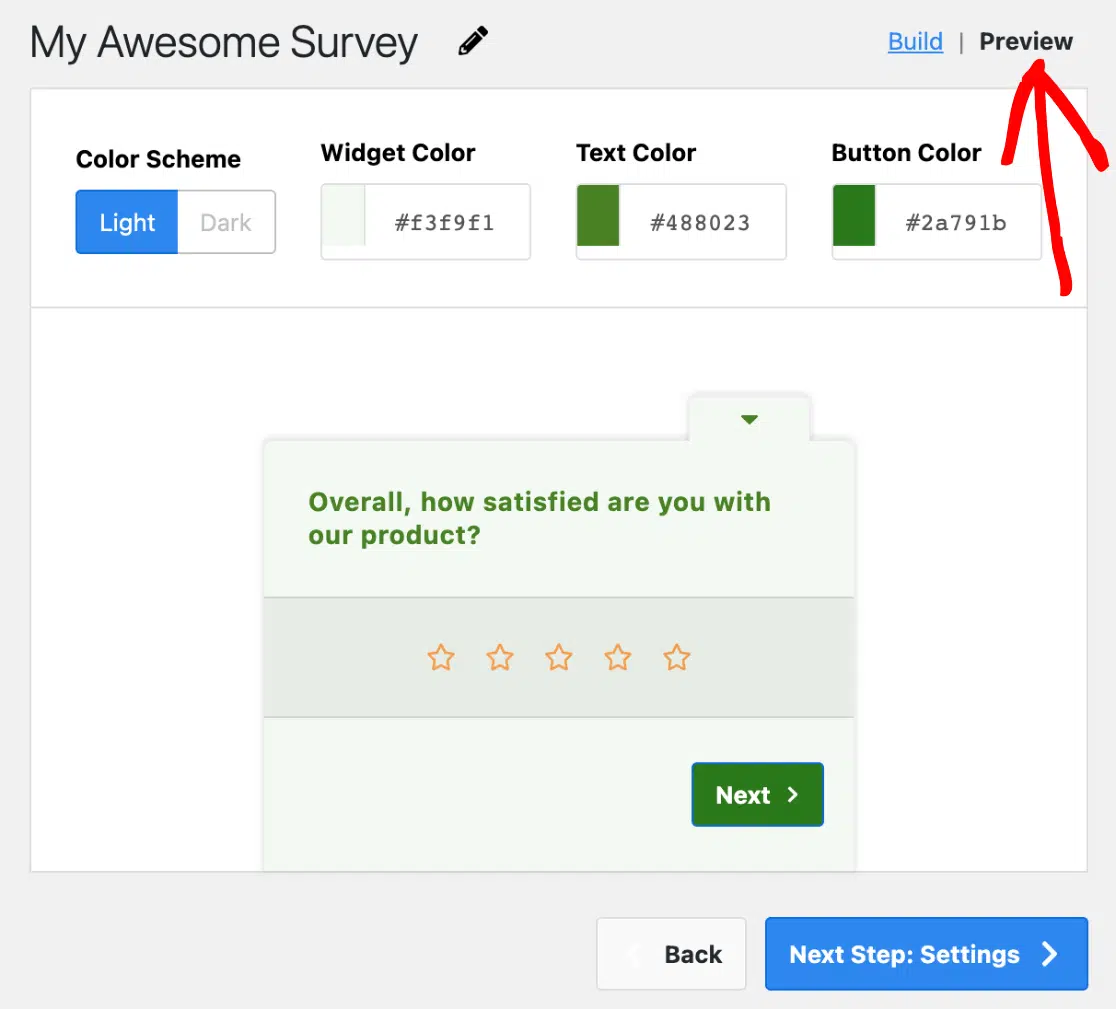
To add your logo to the popup satisfaction survey, choose which side of the screen the widget is displayed on, or set global colors for all your surveys, use this guide for customizing the appearance under UserFeedback’s admin settings.
When you’re done customizing your survey design, click the Next Step: Settings button at the bottom
Step 7: Manage Settings for Your Customer Satisfaction Survey
Next, we’ll edit the settings to ensure customer satisfaction survey best practices. First, under Tracking, you’ll see a toggle option to Enable Google Analytics Tracking.
![]()
This will allow UserFeedback to integrate with MonsterInsights so that you can track your users’ ratings and responses easily. You’ll definitely want to toggle this on.
Not using MonsterInsights yet? It’s the best WordPress analytics plugin, making it easy to track form submissions and see your analytics insights, all from your WordPress dashboard. Its seamless integration with UserFeedback makes it all the more powerful for small businesses.
Get started with MonsterInsights now.
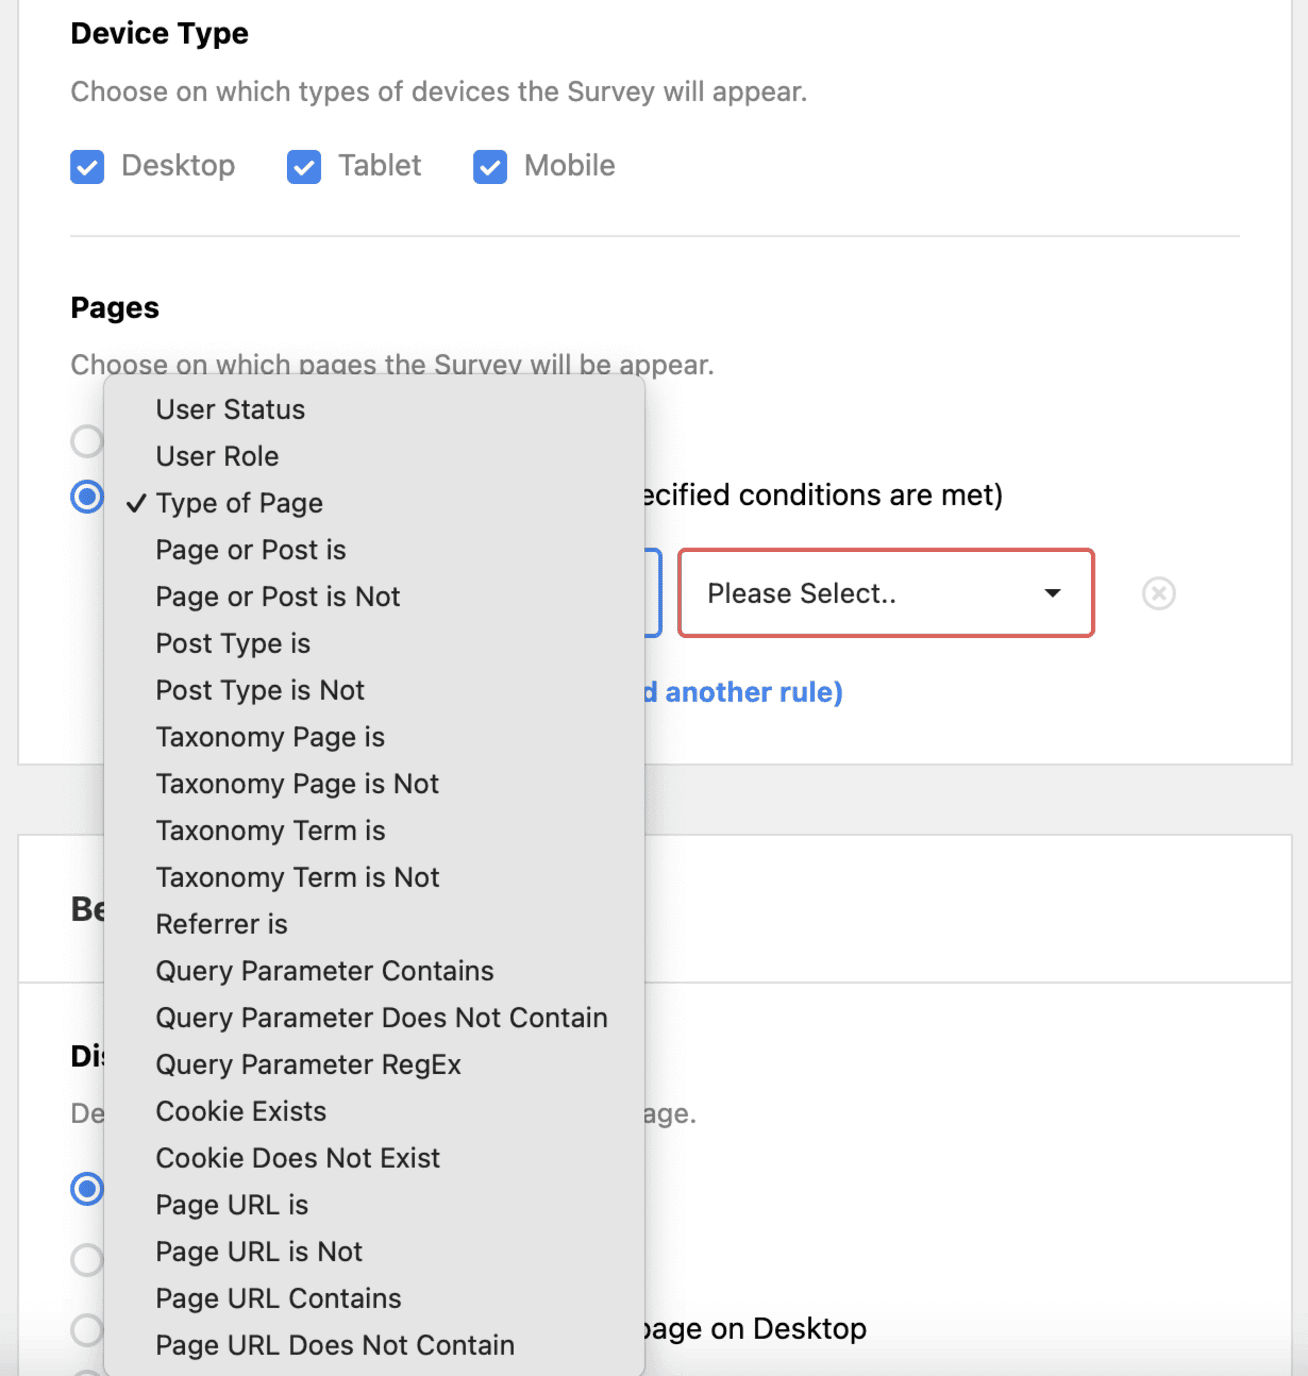
Targeting is the next feature to explore under settings. If you have a Pro license or higher, you can select specific device types for displaying your survey.
This feature is great for comparing how satisfied customers are, based on their interaction with your mobile site vs desktop, by running different customer satisfaction surveys for each device type.
Next under Targeting, you can customize the pages where your customer survey questions appear. You could choose to display the question only on the checkout page, on all pages except for a few, or on a combination of pages.
Maybe you have pages that are behind gated content, and you want to gain insight into your loyal customers’ needs by asking how satisfied they are.
Page rules are helpful for narrowing down the target audience demographic.
To add pages and rules, click to add a rule and use the provided drop-down options.
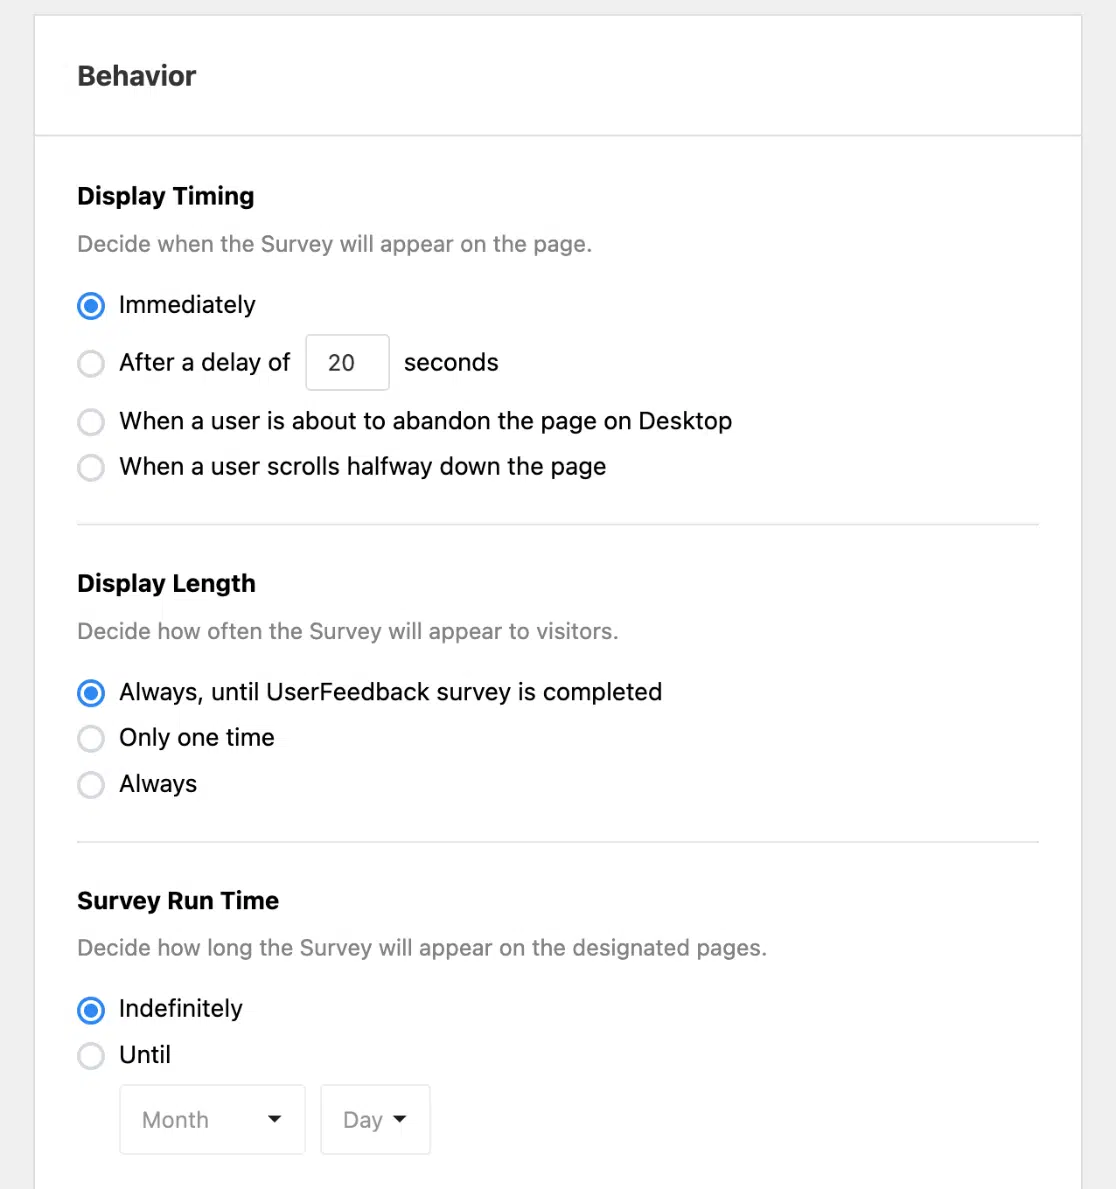
Moving on to the next feature in Settings, we have Behavior.
This section enables you to personalize the Display Timing (when your survey will appear), Display Length (the feedback form’s frequency), and Survey Run Time (how long the customer satisfaction survey will run on your website).
After you’ve customized these features to your liking, you’ll see Start Survey Minimized as the last option. Turning it on, or not, is up to you.
Having your customer satisfaction survey open automatically might increase the number of customers who respond, but you may prefer a minimized survey for the design aspect. Toggle the option you prefer.
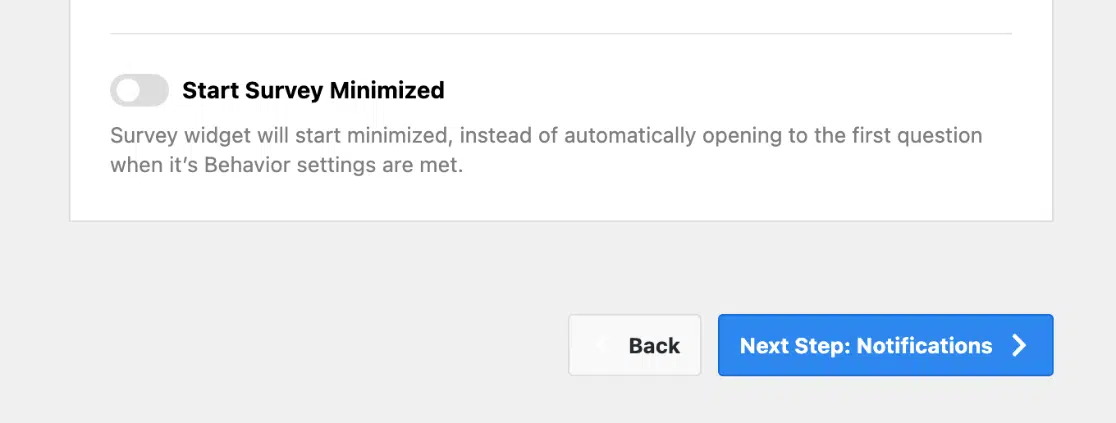
After you’ve finished managing your survey’s settings, click the Next Step: Notifications button at the bottom.
Step 8: Edit Your Notifications for Customer Responses
You can now choose whether or not you want to receive email notifications for your customer satisfaction survey online responses. To do this, you can turn on or off the Send Email option and enter the email address you would like to use.
If you are using the recommended Pro license, you’ll have an additional useful feature that lets you customize the criteria for responses that trigger the email survey results feature.
For example, you could set it to only send an email if the customer satisfaction rating was less than 5 stars. Click the checkmark next to Enable Conditional Logic to use this feature, and you’ll see the options to customize.
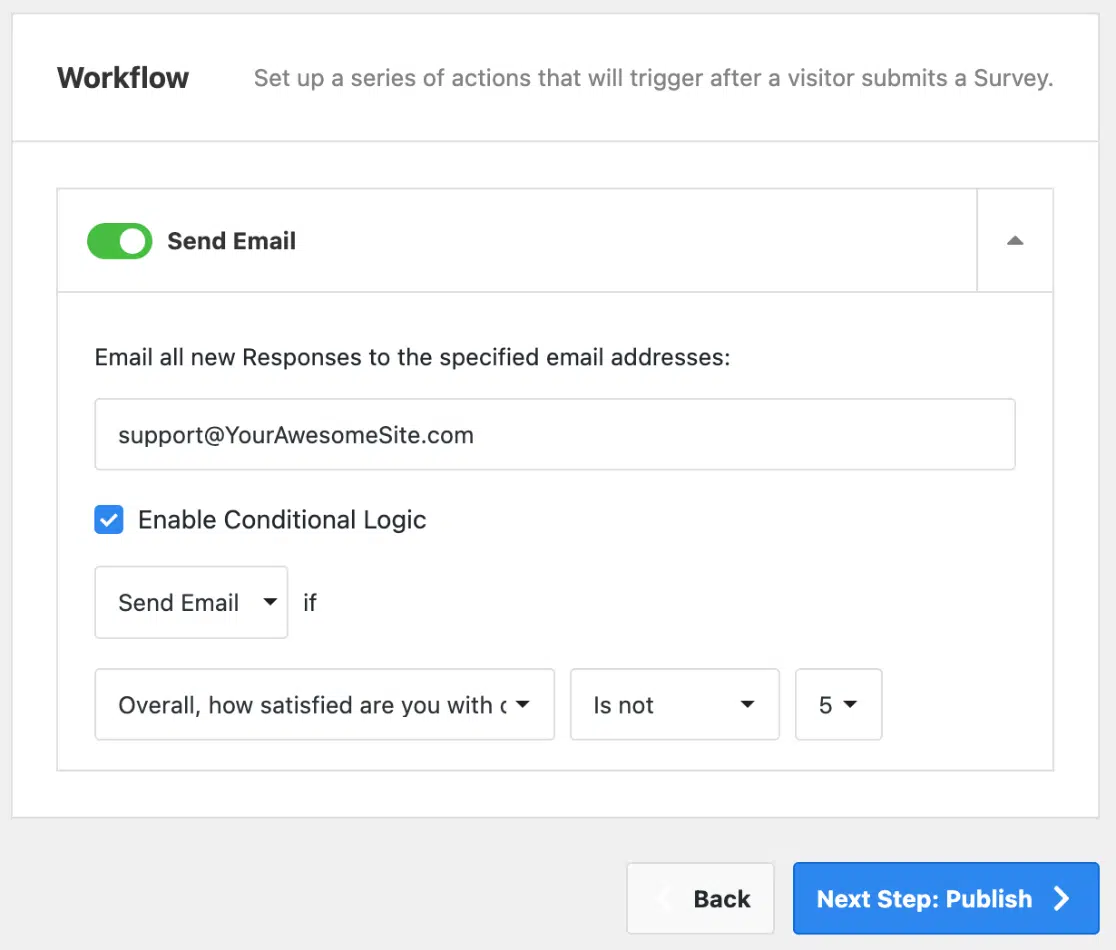
When you’re finished, click Next Step: Publish. You’re almost done making your first customer satisfaction survey!
Step 9: Publish Your Customer Satisfaction Survey Online
Now that you’ve learned how to create a customer satisfaction survey on WordPress, it’s time for the last step. You’re ready to publish your survey!
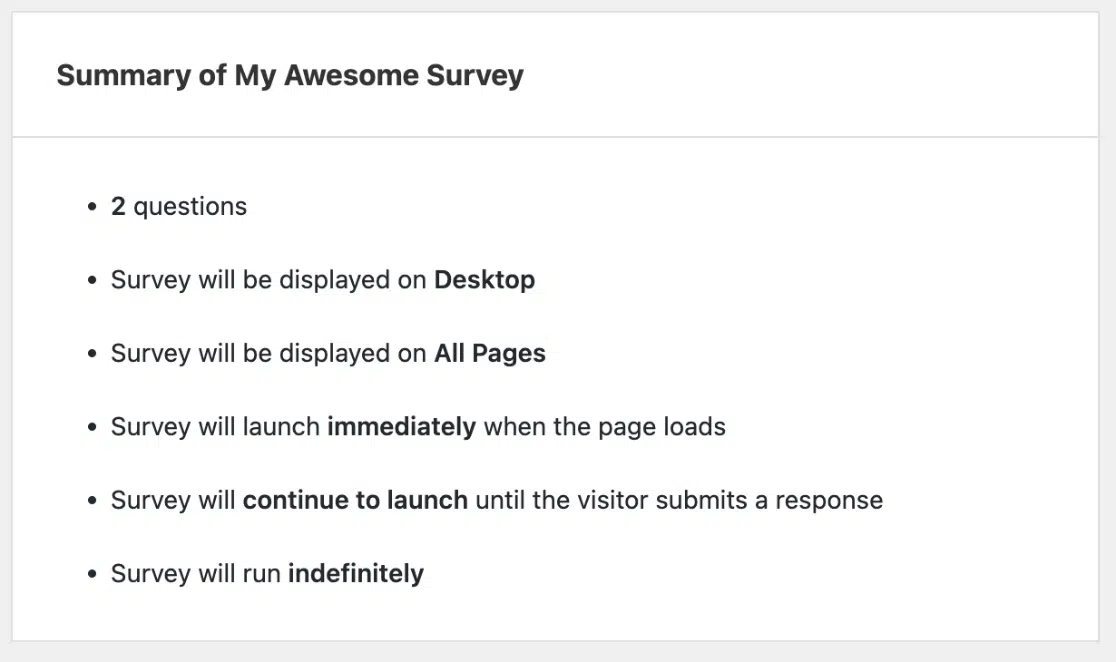
You’ll first be shown a Summary with the settings for your customer feedback survey. If everything looks good, scroll down.
Next, you’ll see the Publish section. Double-check that the Publish button is highlighted blue, or click it if needed.
Using the Pro license? You can take advantage of the schedule survey tool we mentioned earlier. This feature allows you to set a specific date and time for your customer satisfaction survey to go live. To utilize this tool, simply toggle on the Schedule for Later option and fill in the relevant details.
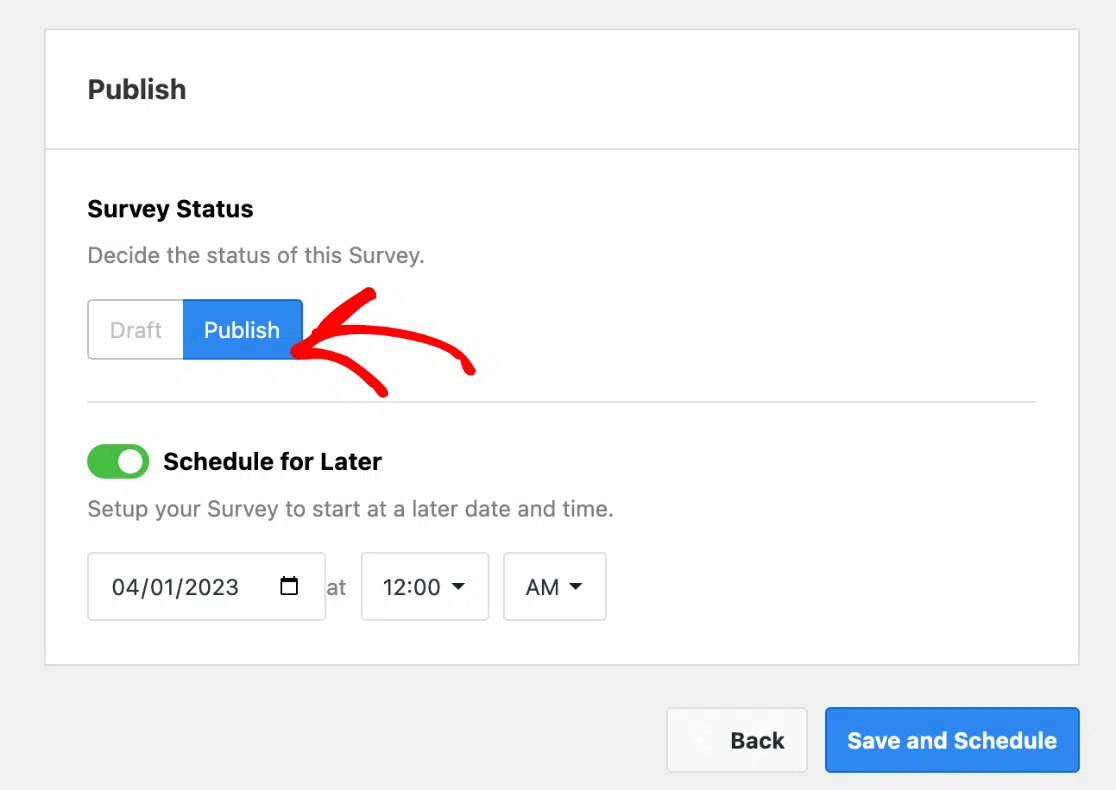
When everything is all set, press the Save and Publish, or Save and Schedule, button at the bottom. You did it! You’ve successfully created a customer satisfaction survey online!
Check out how our customer satisfaction survey example looks when it’s live on WordPress!

Collecting customer feedback with a customer satisfaction survey is an awesome first step toward improving your business!
With UserFeedback, you can get all types of customer feedback, reveal your website visitors’ thoughts, ask follow-up questions, and more. You can easily see your customer satisfaction survey reports in UserFeedback.
If you enjoyed this tutorial, check out:
- How to Get Customer Feedback Online (6 Best Ways)
- 20 Customer Satisfaction Survey Examples & Templates to Use
- The Ultimate Guide to Website Feedback
- How to Create a CES Survey in WordPress (Step-by-Step)
And don’t forget to follow us on X and Facebook to learn more about collecting user feedback online.

